Wednesday, 30 March 2011

Crayons Tutorial

During our Crafty preparations for Mothers Day I managed to get round to something I have been meaning to do for ages, crayone recycling!  I have been meaning to recycle all of our old broken crayons and also the free ones we get whenever we go out for a meal that end up in little packets all over my handbag!

This was the easiest project ever, if a little messy.  To recycle your crayons just follow these easy steps:

You will need:
Crayons - these really need to be wax crayons - the quality of output differed depending on the crayon
Mould in a shape of your choice - we had 2, 1 butterfly silicone one that could go in the oven and 1 Micky Mouse ice cube tray
Jar or receptacle for your crayons to be melted in (if your mould cannot go in the oven)
Stick for stirring

Method
We tried 2 methods, melting on the hob and melting in the oven directly in the mould.

Step 1 - Peel all the papers off the crayons and break into small pieces (the little ones can help with this stage.

Step 2 - (Melting on the hob method) Put your bits of melted crayon into the jar and place the jar in a pan containing boiling water (pic 1).  Stir carefully whilst the water boils and your crayons melt.  When all of the crayons are melted pop into your mould (pic 2).

Pic 1
 Pic 2

Step 2 - (Direct in the oven method) Pre-heat the oven - gas mark 4 (180C/350F).  Put the crayons into your chosen mould.  We used a butterfly shaped mould and also some silicon fairy cake cases so that we could put more colours in our Mickey Mouse ice cube mould (pic 3 and 4).  Place these crayons in the oven on a baking tray for 5 minutes but keep checking them and take out when melted.

                                              Pic 3
    

Pic 4

Step 3 - Once melted the butterfly crayons could be placed in the freezer to set.  The crayons in picture 4 we poured into the Mickey Mouse ice cube tray and then placed this in the freezer also.

Step 4 - After about 30 minutes the freezer will have done it's job and will have helped to set your crayons (pic 5).  Simply pop out your crayons and you will have fabulous shaped crayons that your chilren will love (pic 6)

Pic 5   
 
Pic 6

Points to Note
  • Because I had used various different types of crayons some melted better than others.  Some were very lumpy and didn't make great crayons at all (look closely at the blue crayons in pic 5&6) so if you are making these as a present I'd suggest buying some good quality crayons - I think I'm going to do some for party favours  as they make a great unusual gift.
  • Don't leave the crayons in the oven too long - they are quite smelly and seem to go a bit bubbly
  • Don't leave the crayons in the freezer to set too long! Obvious I know but try explaining to a 2 year old why her butterfly crayons aren't working when they are frozen stiff because Mummy got distracted and left them in the freezer too long!
Have fun!


Mothers Day Crafts

With Mothers Day fast approaching Bella and I did some creative crafts as little presents.  One of her favourite things to do is paint so we had great fun painting Nanna and Grandma some lovely flower pictures and will be buying them flowers to match.  Grandma loves daffodills so we painted some for her and Nanna's favourite colour is purple so she had some lovely purple ones!


Next up on our crafty day is recycling crayons - tutorial on it's way

Monday, 28 March 2011

Bits and Bobs

Blog posts have slowed a little now, it's getting nearer to craft fair season so I'm a busy busy bee making lovely things to sell.

In between though I have had chance to make my little girl some little toys that she has been longing for.  She loves a little cartoon called Bits and Bobs about two puppets who, along with their wheeled machine, Trog, set out to investigate the world.   Throughout the programme, children are encouraged to answer questions posed by Bits and Bobs helping children to develop problem-solving skills whilst thinking through answers.  Here's an official picture of the characters:

Bits and Bobs

We haven't been able to find any merchandising for these little characters so Mummy promised to have a go at making them.  Every time we go into a fabric shop Bella has been reminding me about fabric for bits and bobs - she has a very good memory when she wants!

Last week I found just the fabric on a great shopping trip (see my other post about the NEC Sewing For Pleasure Show).  As I only had a couple of hours to make them I didn't get chance to take pictures of each stage but there are loads of tutorials out there about how to make fabric balls - the purl bee has a really good straightforward one.  I  made 2 balls using the '6 pieces of fabric cut in the shape of a leaf' type of pattern (as opposed to the 'sew lots of hexagons together' pattern), added my eyes and felt eyelids and mouth before sewing the pieces together leaving a small hole to turn them the right side out, filling with toy stuffing and slip stitching the gap.  The end product is pictured below, my little girl couldn't believe it when she woke up, isn't that the magic thing about creating things for your children!


Sunday, 27 March 2011

Sewing For Pleasure

I attended the Sewing For Pleasure show at Birmingham NEC on the 24th March and it was brilliant.   There were so many amazing stands I didn't know where to look first!  I had gone with the intention of looking for a new sewing machine and it didn't disappoint.  All of the big sewing machine suppliers were there along with a number of stands selling amazing fabric and unique ribbons from Crafty Ribbons, there will be project coming soon using them all!  Look how great the ribbons are:
Back to my main purpose for visiting the show, to source a new machine.  I had done quite a bit of research on the internet and my gut feel was to stick with Janome.  I have had a Janome 2200XT machine and have loved it, they come with a multitude of feet which would cost quite a bit with other suppliers, the instructions are clear and easy and they have a good support network in local dealers.   I was helped by Maureen who was brilliant, both in her machine expertise but also in her ability to keep my wriggling 2 year old entertained during the demo.  She somehow managed to juggle my 2 yr old on her knee whilst showing me all the great features the computerised machines have.  She did all this whilst sewing Bella a little piece of fabric with hearts and her name on (which she loves and tells everyone is a kite - I think because of the threads)! 

In the end after a whole weekend of deliberation I decided to push the boat out, think of the long term and ordered the Janome MC4900QC.  This machine looks great and has all of the features that I need plus a whole load more!  If you haven't seen the machine and are interested you can read more at the Janome website.

So all in all a successful show visit if not a very expensive one!!!

Friday, 18 March 2011

Label Love

How exciting, I have now officially sold 180 products through the craft fairs, well that's how many labels I have used!  I tentatively ordered 36 at first which I soon realised wasn't enough so I ordered 144 more and now, with the sale of the latest batch of bibs and bandanas I'm all out again.

I researched various views from crafts people and lots seem to have ordered from an etsy shop,  Fancy Weaver in Hong Kong - I guess it's a little risk to take but the feedback is positive and isn't that surely the benefit of having etsy there, that like minded people use and provide feedback on the sellers!  So I'm being brave and going for 600!

I have had great fun with the support of my (more technically minded) Hubby designing my labels as I've had basic craft labels until now - how exciting!  I'd re-designed my banner for the blog and also the website so I've utilised that design and it's great that I've been able to add on care instructions and a link to the website - more advertising and at half the price of the usual labels (8p each instead of 16.6p)!


I'll post pictures of the labels when they arrive then if anyone else is interested they can see the genuine article for themselves.

Signing off for now, sleep is calling!

Wednesday, 16 March 2011

Busy Bee with Bibs and Buttonholes

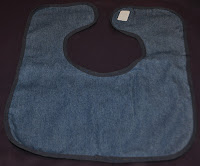
With my little girl being ill it's thrown all of my sewing plans into disarray.  She's started to get a little better now though so I've begun to try to catch up.  First on the list were lots and lots of bibs for children with complex needs.  They were very well recieved so much so I soon found myself making 35 of them - Here's just a few of them - such cheerful colours!


Next on the list is writing a tutorial on buttonholes for the UK Sewing Directory blog (full post to follow about that).  I made another cute retro apron to use as the tutorial project as I plan to give it to friends who have a new house.  I made a mens half apron to go with it too, aren't they cute.


So that's me for now, I'll get back to catching up with all of my sewing projects!  I've still got the Sewn with Love dress that is sat all cut and ready to sew in my sewing class bag.  I'd hoped to finish it by now but life got in the way like it does so I'm going to make it the focus of my next set of sewing lessons that start next week.

Tuesday, 8 March 2011

Poorly babe and a thoughtful friend

So, I just thought I'd post to say I've been away from my blog for a little while because my little girl has been a poorly bunny and ended up in hopsital last week.  She's on the mend now, a nasty case of gastroenteritis which left her low on sugar, salt and a whole other host of things so she had a short visit to hospital to sort things out.  It's all been a little crazy and so not much sewing being done though look how happy she was today to recieve a very special gift from a friend, Marilyn in a UK facebook group I belong to called 'make do and mend'.  It's her very own cottonsocks that I'd wanted to make but just hadn't had time!  There were also some lovely butterfly hairclips - very kind and generous!  Thank you Marilyn, it's lovely to know there are some thoughtful, caring people out there who would do such a great thing for someone they haven't even met.  Bella will go to bed tonight a happy little girl with her cottonsocks!


Hopefully I'll be back soon with my Sewn with Love project that is just sat there waiting for me to get to it!

Want to read more................

Click on older posts above to read more posts