I haven't been very well the past week and a half hence the lack of posts so just to keep up momentum whilst I'm recovering I thought I'd post two exciting finds. These are the Royal Wedding website and also the Royal Wedding Flikr group. Here you can find all sorts of information on the Wedding, pictures, information etc - very indulgent! I spent the day with my little one making sparkly crowns with her cousin and just a few friends watching many hours of wedding bliss!!

Saturday, 30 April 2011
Tuesday, 26 April 2011
Giveaway Winner
Thank you to all those who have commented, followed, liked or blogged about my button giveaway.
Congratulations to Pickle Lily who is the winner of my giveaway! The competition closed at midnight so first thing this morning I used Random.org to generate a number which came out to be number 32 (see screen print below). Here's Pickle Lily's comment


Congratulations to Pickle Lily who is the winner of my giveaway! The competition closed at midnight so first thing this morning I used Random.org to generate a number which came out to be number 32 (see screen print below). Here's Pickle Lily's comment


So, Congratulations Pickle Lily and Thank You again to all those who followed Bella Boutique on blogger or facebook, posted about us on your blog or just left your comments.
Keri
Thursday, 14 April 2011
Win a fabulous Button Stash - Easter Giveaway

The buttons range from basic buttons great for small projects like these stars, apples and hearts.............


.........to grown up buttons in all the lovely colours of the rainbow


Look at these fabulous buttons, these are from Ribbon Circus another fab haberdashery I frequent.

And the final buttons on the giveaway are my favourite kind, chocolate ones!

I'm sure many of you will want to win this great haul of buttons, so this is what you need to do
1) Become a Follower of Bella-Boutique by clicking on the Follow or Follow by e:mail button on the left hand sidebar - leave me a comment to say you are now a follower. This will give you one entry to the Giveaway.
(Blogger has today had an issue with the follow button so if you can't see it on the left sidebar then there is the same option on the top menu or your could follow by e:mail or pop back, sorry, how frustrating, today of all days)!
2) Leave a comment on this post telling me what you would do with some of these lovely buttons if you were the lucky winner. Your comment will give you another entry to the Giveaway.
3) If you have a blog of your own you can earn a third entry to the Giveaway by linking to my blog or this giveaway on your blog - with a link to my site. Let me know you have done so, by adding another comment to this post.
4) Finally, if you want a fourth chances to win 'Like' Bella-Boutique on Facebook - comment back to this post to let me know.
Giveaway will be open until Easter Monday, April 25th, 2011 at midnight (GMT).
The winner will be drawn at random using a random number generator from the total count of comments.
International participants are welcome.
Good luck to you all and thank you for visiting Bella-Boutique
Keri
Cute as a Button
Today I have a guest blog post on the UK based 'The Sewing Directory' Blog. You can pop there to view it in it's full form but below are a couple of excerpts.
The Sewing Directory has asked for guest bloggers to help with tips and techniques and so (as I have been sewing plenty of buttonholes and buttons lately) I thought it might be helpful to pass on my technique and also some links to others who have great skills in creating them by hand also! I am by no means an expert, but hopefully can pass on some of the hints and tips I have learned and condense some of the information that is out there about the different types of buttonhole you can create.
When opening my machine from the box I felt completely overwhelmed with the multitude of attachments that arrived and so have been slowly learning the techniques required to make the best use of them. One particular attachment was a sliding buttonhole foot! I didn’t have a clue what to do with this but my instruction book was quite clear so if you have a foot that looks like picture 1 below here are my ten easy tutorial steps to help you sew a buttonhole:
Step 1 - First you will need to look for a setting that looks something like picture 2 below. Most modern machines will have some kind of setting that helps with buttonholes but don’t worry if yours doesn’t, just skip to the bottom of my post and there are some useful links for creating a buttonhole on a machine without a specific setting and also by hand.
That's it as a teaser for now!!! To view the rest of the post please visit The Sewing Directory to view! I promise that I will eventually post the whole post here but I wanted to be fair and allow people to view it at the guest site first!
The Sewing Directory has asked for guest bloggers to help with tips and techniques and so (as I have been sewing plenty of buttonholes and buttons lately) I thought it might be helpful to pass on my technique and also some links to others who have great skills in creating them by hand also! I am by no means an expert, but hopefully can pass on some of the hints and tips I have learned and condense some of the information that is out there about the different types of buttonhole you can create.
When opening my machine from the box I felt completely overwhelmed with the multitude of attachments that arrived and so have been slowly learning the techniques required to make the best use of them. One particular attachment was a sliding buttonhole foot! I didn’t have a clue what to do with this but my instruction book was quite clear so if you have a foot that looks like picture 1 below here are my ten easy tutorial steps to help you sew a buttonhole:
Step 1 - First you will need to look for a setting that looks something like picture 2 below. Most modern machines will have some kind of setting that helps with buttonholes but don’t worry if yours doesn’t, just skip to the bottom of my post and there are some useful links for creating a buttonhole on a machine without a specific setting and also by hand.
Picture 1 Picture 2


Step 2 - Following your sewing machine instructions affix the sliding buttonhole foot and thread your machine as you would for usual sewing.
Step 3 - Measure your buttonhole on your fabric. I usually do this by putting my button on the fabric (next to where I want the buttonhole to be) and drawing an I shape the size of the button.
As promised I have also included some links at the foot of this post for a number of other buttonhole related articles such as how to create a buttonhole by hand and how to create a buttonhole on a machine that doesn’t have a specific setting
I hope these are useful and you find the steps above leave you feeling brave enough to have a go- Good Luck
That's it as a teaser for now!!! To view the rest of the post please visit The Sewing Directory to view! I promise that I will eventually post the whole post here but I wanted to be fair and allow people to view it at the guest site first!
Keri
Knitted buttonhole - http://www.learn2knit.co.uk/knitting/buttonholes.php Bound Buttonhole - http://www.blogforbettersewing.com/2010/10/bound-buttonhole-tutorial.html
Normal Buttonhole and corded buttonhole - http://sewmamasew.com/blog2/?p=846
Hand Sew a Buttonhole - http://www.colettepatterns.com/blog/tutorials-tips-tricks/handmade-buttonholes
Buttonhole on machine that has no buttonhole setting - http://untilwednesdaycalls.blogspot.com/2010/03/how-to-manual-machine-buttonholes.html
Wednesday, 13 April 2011
Giveaway Fun
I was very excited to hear today that I won a wonderful prize in a giveaway for the first time. Chasing Cottons Quilt Designs is written by Rebecca Johnson who is an amazing quilt maker with a lovely pretty blog that has great tutorials and ideas. Thanks to Rebecca who is now arranging for me to recieve my prize a fab $20 gift voucher for Sew Mama Sew (another one of my favourite blogs to visit for sewing tutorials but they also have an amazing shop with fabrics and patterns, mmm).
This is a lovely thing to win particularly this week as I am featuring as a guest blogger on the UK Sewing Directory blog tomorrow and so in conjunction I'm going to be doing a big button givewaway so you could be in with a chance of winning something too!
This is a lovely thing to win particularly this week as I am featuring as a guest blogger on the UK Sewing Directory blog tomorrow and so in conjunction I'm going to be doing a big button givewaway so you could be in with a chance of winning something too!
Sunday, 10 April 2011
Sewn With Love Tutorial turned Pattern Review - Part 2
You may remember a short while ago I posted the first part of this tutorial/review where I tried to make the bodice of one dress and the skirt part of another from Fiona Bell's Sewn With Love/Vintage Style for Kids fabulous book.
This is the part where I basically stick the skirt to the bodice, eloquent hey! This is also the part where the millions of pictures give way to a few instructions reviewing the pattern and a fabulous picture of the finished article. You got it, I made this dress across my sewing classes and the class where I finished it off I forgot to take my CAMERA! As Homer would say, DOH!
So, where I left us in Part 1 I had a beautiful bodice with a waistband attached.


If you have followed the pattern cutting instructions you will have 3 layers of skirt, a lining, net and the outer fabric. The pattern for the tulip skirt recommends first cutting a vertical slit in the back for the button extension but as I was using a different bodice it did not have a button extension. I decided to miss out that step and in the end it wasn't necessary as there was more than enough room to get my little girl in the dress with the buttons undone.
Step 1 - You will need to sew 2 lines of gathering stitches on each of the 3 layers ensuring to set your stitch length to as long as possible and making sure you have long threads at each end. Next on each layer hold one end of the threads and gather the fabric. For this step I measured around the bottom of my bodice and made sure that my end gathered strip was the same length.
Step 2 - Once all 3 layers are gathered and the same length I sewed them together so it's an easier project to handle, trust me 3 layers of fabric gathered this much is BIG!

Step 3 - In the picture below you can see that the waistband is open and you are basically going to sandwich your 3 layers inbetween. The book recommends just sewing them together but this would leave you with 5 layers of fabric edges exposed and even overlocked I felt this could be a little prickly so my fab sewing tutor suggested first sewing the skirts to the inside part of the waistband.


Step 5 - Next step is to sew the buttonholes and buttons. I'm posting a buttonhole tutorial on Thursday (in conjunction with the UK Sewing Directory blog) so you could either wait for that or using your machine's instruction manual sew the four buttonholes and buttons on. I chose beautiful flower buttons.
Step 6 - The final step is to hem the lining and outer skirts (the net doesn't need hemming).
Here is the final article, I haven't been able to get my little one to stand still for long enough to pose so it's an empty dress but I'm sure you'll agree with all that net it's actually quite full!!!

 So.....I hope this has helped with a few 'hints and tips'. I think I've realised with something so complex it's quite difficult to track all of the steps, particularly given that I'd added in lining etc but I hope it's a starter for ten to inspire those of you who have been looking longingly at the items in the book but not daring to start! Feel free to e:mail me if you have any questions and I'll see if I can help!
Keri
This is the part where I basically stick the skirt to the bodice, eloquent hey! This is also the part where the millions of pictures give way to a few instructions reviewing the pattern and a fabulous picture of the finished article. You got it, I made this dress across my sewing classes and the class where I finished it off I forgot to take my CAMERA! As Homer would say, DOH!
So, where I left us in Part 1 I had a beautiful bodice with a waistband attached.

If you have followed the pattern cutting instructions you will have 3 layers of skirt, a lining, net and the outer fabric. The pattern for the tulip skirt recommends first cutting a vertical slit in the back for the button extension but as I was using a different bodice it did not have a button extension. I decided to miss out that step and in the end it wasn't necessary as there was more than enough room to get my little girl in the dress with the buttons undone.
Step 1 - You will need to sew 2 lines of gathering stitches on each of the 3 layers ensuring to set your stitch length to as long as possible and making sure you have long threads at each end. Next on each layer hold one end of the threads and gather the fabric. For this step I measured around the bottom of my bodice and made sure that my end gathered strip was the same length.
Step 2 - Once all 3 layers are gathered and the same length I sewed them together so it's an easier project to handle, trust me 3 layers of fabric gathered this much is BIG!

Step 3 - In the picture below you can see that the waistband is open and you are basically going to sandwich your 3 layers inbetween. The book recommends just sewing them together but this would leave you with 5 layers of fabric edges exposed and even overlocked I felt this could be a little prickly so my fab sewing tutor suggested first sewing the skirts to the inside part of the waistband.
Please excuse my makeshift picture. If you imagine the red shape is the skirt then you are going to pin it, with right sides together, in this position on the underside of the inner waistband and sew. 

You will now have a pretty inner waistband with your skirts attached.

Step 4 - Next you need to turn the dress to the right side and ensuring that the skirts are securely tucked inside, fold under then topstitch the front waistband to the skirts.

Step 6 - The final step is to hem the lining and outer skirts (the net doesn't need hemming).
Here is the final article, I haven't been able to get my little one to stand still for long enough to pose so it's an empty dress but I'm sure you'll agree with all that net it's actually quite full!!!


Keri
Beautiful Butterfly Projects
One of the reasons I first started sewing was to create beautiful things for my little girl so it was great this week to see some of my early projects come to fruition. We have just begun to sort out her 'big girl' bedroom and with that came a wealth of opportunity for great fun decor projects.
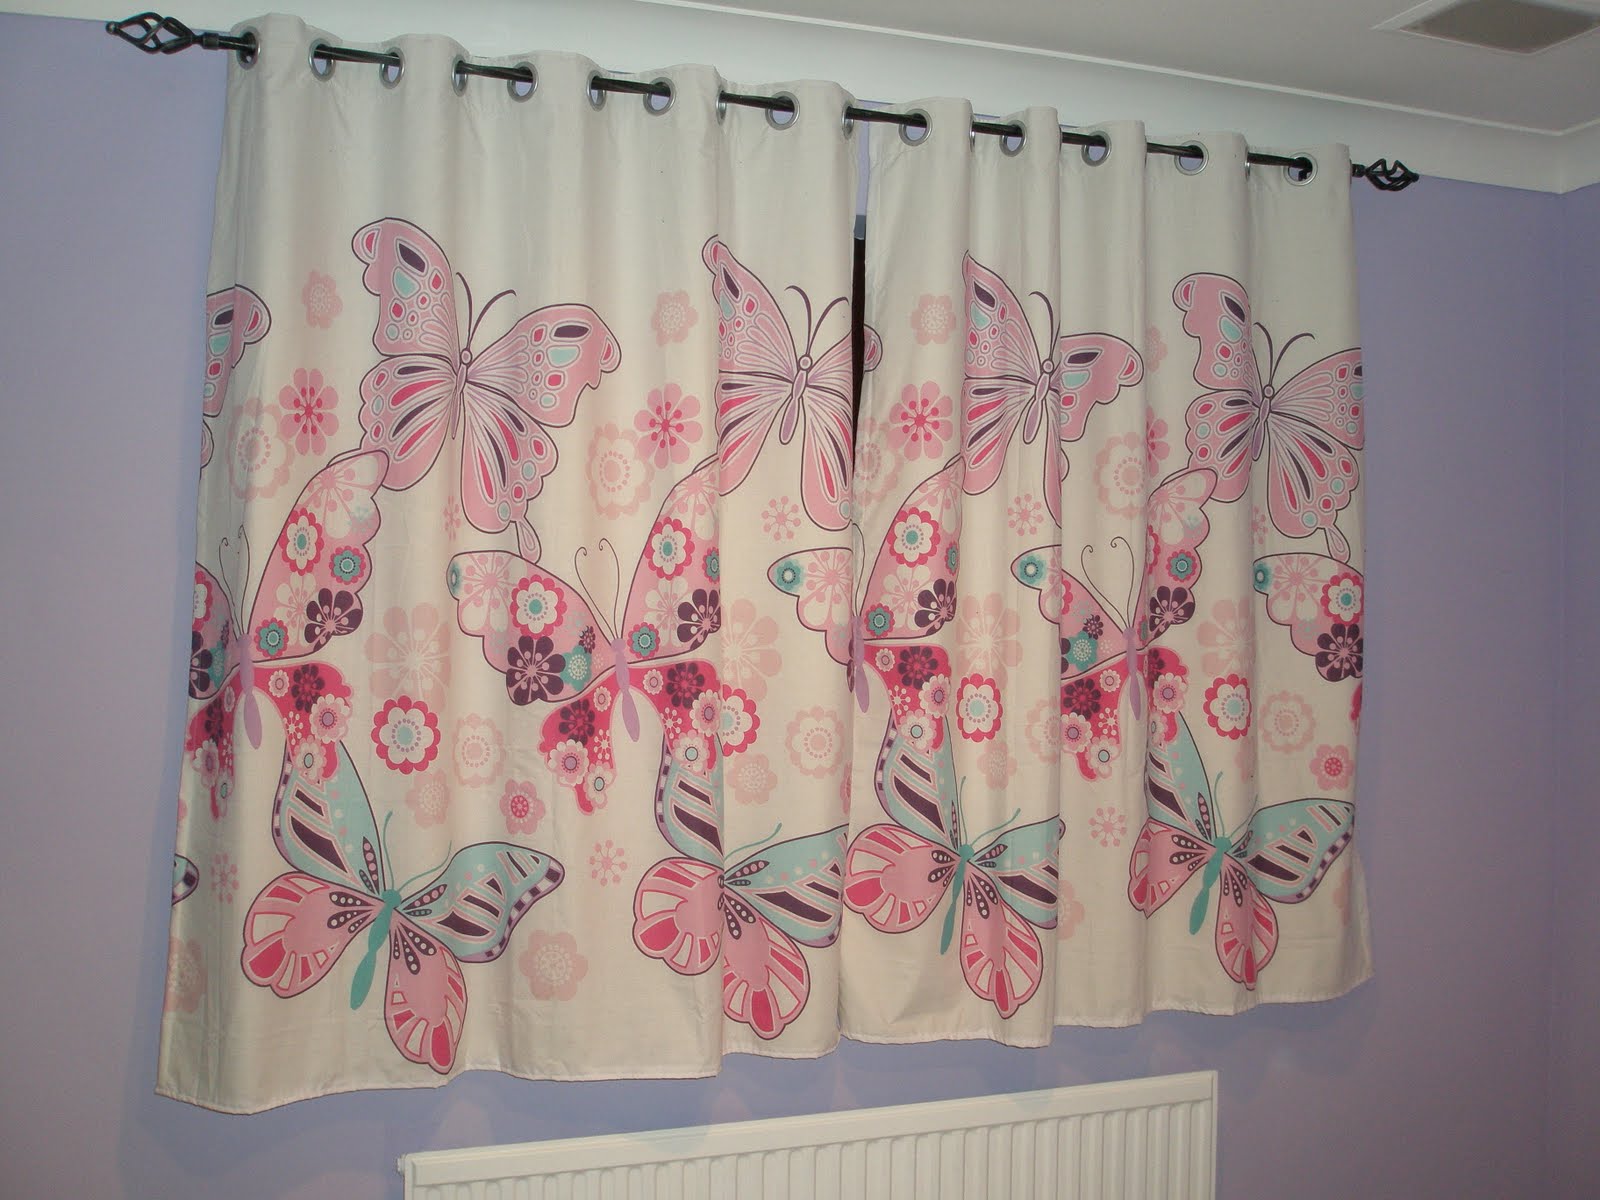
Project 1 - Curtains - I couldn't find matching curtains to co-ordinate with her bedding so as one of my early sewing projects I made her some blackout lined curtains from an additional bedding set.

Project 2 - Cushion with pom pom trim - I used one side of the patterned pillowcase to make a cushion and used some great pom pom trim that I had been keeping for just the perfect project.
 Project 3 - Pinless Noticeboard/Hairclip board - This was also made from the other side of the pillowcase

Project 4 - Felt 3D Letters - I have had this tutorial saved for felt letters from made by rae's blog so this is my attempt and by goodness are they fiddly, think it's worth it though!
 Project 5 - Height Chart - The felt letters inspired me to make this height chart. It was chance for me to have another go at using the monogram function on my new machine and I purchased fab sparkly purple thread especially for the occasion.


Keri
Project 1 - Curtains - I couldn't find matching curtains to co-ordinate with her bedding so as one of my early sewing projects I made her some blackout lined curtains from an additional bedding set.
Project 2 - Cushion with pom pom trim - I used one side of the patterned pillowcase to make a cushion and used some great pom pom trim that I had been keeping for just the perfect project.


Project 4 - Felt 3D Letters - I have had this tutorial saved for felt letters from made by rae's blog so this is my attempt and by goodness are they fiddly, think it's worth it though!


Back to making Craft fair stock now I have done my bit of indulgent Mummy sewing!
Keri
Saturday, 9 April 2011
Fun with Letters
After buying my new Janome MC4900QC machine I was faced with a wealth of new stitches including the alphabet, almost too many choices! I decided to do a couple of little projects. The first was a card for friends who were setting off to climb to base camp at Everest! This is my first attempt at the lettering and I found there is definately a knack of selecting the right thread and fabric - as you can see it's not quite right here!
My next project was a little more successful, I made 2 cushions for my friends new twin babies. I have hidden their surnames for obvious reasons but I'm sure you can imagine the full effect. I was really pleased how this worked out. The fabric is the same as my friends nursery range, I just ordered a pillowcase to work with and the decorative stitch is super cute, I love them, lets hope she does too!


Great fun and I can see many more projects in the pipeline. I'm already on with making some cute age markers for Isobella's height chart - more to come on that topic soon!
Keri

My next project was a little more successful, I made 2 cushions for my friends new twin babies. I have hidden their surnames for obvious reasons but I'm sure you can imagine the full effect. I was really pleased how this worked out. The fabric is the same as my friends nursery range, I just ordered a pillowcase to work with and the decorative stitch is super cute, I love them, lets hope she does too!


Keri
Friday, 8 April 2011
Bella Boutique on Etsy and Facebook
I finally decided to pause the sewing for just a short while so I could set up my etsy shop and get some of my items on there and also begin to sort the Bella Boutique Facebook page.
Feel free to browse through but please be patient as this is an ongoing process and will take just a short while to get everything loaded.
Happy Shopping
Keri
Feel free to browse through but please be patient as this is an ongoing process and will take just a short while to get everything loaded.
Happy Shopping
Keri
Thursday, 7 April 2011
Focus on Word of Mouth Craft & Supplies
I am having so much fun in my sewing classes and love spending time at Word Of Mouth (WOM) Craft and Supplies both in my lessons and browsing the shop so I thought this week I would tell you all a bit more about it.
WOM is run by Jinny and has evolved from a cold stall on Hebden Bridge market selling haberdashery & wool, into an emporium of craft supplies, situated in a bright lofty mill on Valley road.
They sell haberdashery, wool & patterns (including King Cole & Debbie Bliss), fabric, card making & scrap booking supplies, beads & findings, various types of paint, air drying clay & just about everything in between.
Having children herself means that Ginny is exceptionally child friendly and has a wonderful corner in the shop full of toys/crayons and things to entertain your little one whilst you shop - a godsend! Whenever I take Bella I struggle to get her to come away - that is a novelty when you have children.
In addition to the shop they offer an alterations & repairs service on all clothing & soft furnishings, sewing machine sales/repairs/servicing, hold regular art exhibitions, sell locally made crafts (including amazing jewellery made by my friend Liz Wood - Unique Jewels4u), host kids craft birthday parties and run some amazing craft workshops.

The Spring/Summer syllabus can be found here. I attend the weekly Tuesday Sewing classes and have had great fun being taught by the very skilled Helen on various more complex techniques such as making eyelet headed curtains with blackout linings and my sewn with love/vintage style for kids dress which will be making an appearance in a post very very shortly (as soon as it's hemmed)! It's not only a chance to learn from an expert but also great fun socialising with like minded people. I can thoroughly recommend it as it's very inspiring to see some of the amazing projects people are making such as cool shirts (cut from a pattern of a much loved previous shirt), roman blinds and even a beautiful patchwork quilt!
There are a number of one off courses running over summer too so it's well worth a look. Being a lazy sewer I always look for ways to do things by machine so I'm taking the opportunity to attend the hand sewing course but there are other really interesting ones such as introductions to crochet and felt making too.
Tuesday, 5 April 2011
Sewn With Love Tutorial turned Pattern Review
I have been promising to post my Sewn With Love/Vintage Style for Kids post for some time but between making hundreds of items for stock, setting up my Etsy shop and all other fun things it's taken just a while!
I had intended for this post to be a tutorial on how I merged together two elements from different patterns but in my final session I got all excited and ended up forgetting to take enough photos so it will therefore be a combination of pattern review and tutorial. I figured you would need to have the book to obtain the patterns so all in all it should be easy enough to follow.
I have been making this dress as part of my sewing classes so it's fair to say I also have an expert on hand to help!
So I made the bodice from the dress on the front of the book and the skirt from the tulip dress - I wanted a dress for summer without sleeves but with a full skirt and wasn't keen on the tiered efefct.
I happened to have the fabric that I needed but the handy pattern inside the book suggests the supplies that you would need to buy. My supplies were:
 It is worth adding here that the pattern I used for the bodice had neck and arm bindings to be cut out of your fabric, a step which I did but as I had decided to line the dress we managed to put it together without the need for these.
Step 2 - With right sides together, pin the lining and main fabric together and sew at along the top neckline, then around the armhole and down the side of the bodice. Do not sew across the shoulder seam or the bottom of the bodice pieces. Repeat for the other back bodice piece and also for the front bodice. Turn the bodice pieces right side out and on the two back bodice pieces fold and press the back button placet as per the instructions. The back should now look like this.
 Step 3 - Now for the complex part - with the fabric right sides together meet the shoulder seams and pin together just 3 pieces -1 lining and 2 front fabric. Pin the other lining piece back and sew accross these three pieces which will leave you with 1 lining piece free.

 Step 4 - Now turn the bodice inside out (via the bottom of the bodice opening) and sew the final lining layer to the other 3 layers. Once turned right side out you will now have a clean seam with raw edges hidden on both the lining and outer layers. Repeat steps 3 and 4 to join the other shoulder seam and your bodice should now look like this:
 Step 6 - Make up the tie belt and attach to the waistband pieces following the books instructions . You will now have 2 long waistband pieces.
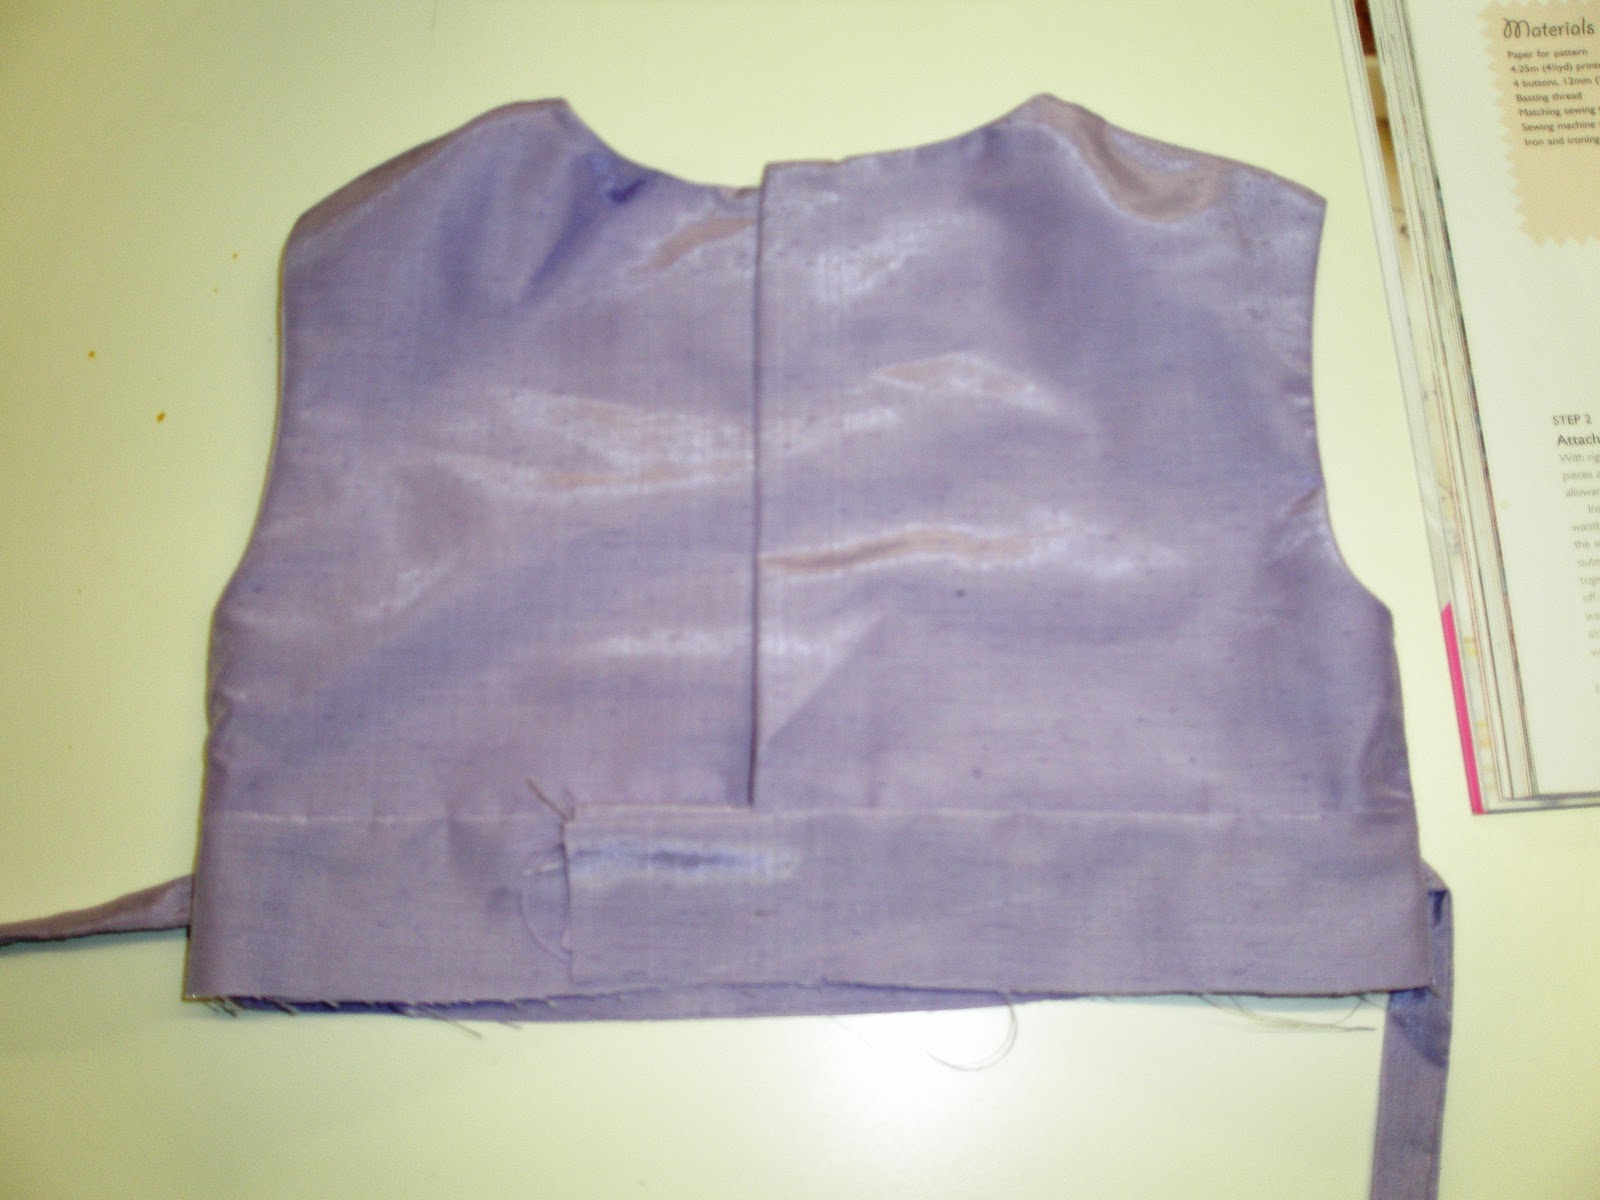
Step 7 - Align the side seams and pin these 2 long waistband pieces to your bodice, ensuring that the ties are in the correct place at the side. You should now have your bodice captured between 2 waistband pieces. Sew along the wasitband section and your garmet should now look like this
 When you turn your bodice the right side out it will look like this hopefully.
So that completes my bodice - coming soon the pattern review post for the skirt (because I got too excited and didn't get enough pictures). Please feel free to comment or e:mail me if you have any queries, it is all quite complex and I appreciate it's sometimes hard to work out just what should happen at each step.
Keri
I had intended for this post to be a tutorial on how I merged together two elements from different patterns but in my final session I got all excited and ended up forgetting to take enough photos so it will therefore be a combination of pattern review and tutorial. I figured you would need to have the book to obtain the patterns so all in all it should be easy enough to follow.
I have been making this dress as part of my sewing classes so it's fair to say I also have an expert on hand to help!
So I made the bodice from the dress on the front of the book and the skirt from the tulip dress - I wanted a dress for summer without sleeves but with a full skirt and wasn't keen on the tiered efefct.
I happened to have the fabric that I needed but the handy pattern inside the book suggests the supplies that you would need to buy. My supplies were:
- Printed pattern from the CD which comes with the book
- 2m of outer fabric (lilac cotton which has a shot silk appearance)
- 2m of lining (book doesn't suggest lining but I found it easy enough to add)
- 1m of co-ordinating net
- 4 beautiful buttons

Step 2 - With right sides together, pin the lining and main fabric together and sew at along the top neckline, then around the armhole and down the side of the bodice. Do not sew across the shoulder seam or the bottom of the bodice pieces. Repeat for the other back bodice piece and also for the front bodice. Turn the bodice pieces right side out and on the two back bodice pieces fold and press the back button placet as per the instructions. The back should now look like this.


Step 7 - Align the side seams and pin these 2 long waistband pieces to your bodice, ensuring that the ties are in the correct place at the side. You should now have your bodice captured between 2 waistband pieces. Sew along the wasitband section and your garmet should now look like this

So that completes my bodice - coming soon the pattern review post for the skirt (because I got too excited and didn't get enough pictures). Please feel free to comment or e:mail me if you have any queries, it is all quite complex and I appreciate it's sometimes hard to work out just what should happen at each step.
Keri
Subscribe to:
Posts (Atom)